Business Owner Essential- Build Your Website
How To Build a Notary Website with Limited Tech Skills Using Bluehost & WordPress
I remember staring at my computer screen, feeling overwhelmed. With minimal technical skills, the thought of building a website for my notary business seemed like a mountain too high to climb.

But then came the turning point. Launching my notary website with Bluehost and WordPress wasn’t just a step forward; it was a leap into a world I never thought I could enter. To my surprise, it led to the landing of my first client almost immediately—a moment of triumph and disbelief.
Disclosure: This post may contain affiliate links, which means that I get a commission if you decide to make a purchase through my links, at no cost to you.
The Bluehost & WordPress Combo for Notary Website Success
I came across an analogy: the Internet is like the real estate market. In real estate you purchase a plot of land, hire an architect/construction company to build your house, and then pay maintenance fees to maintain your home. For the Internet, you need to purchase a domain name which is your URL (your address) on the Internet, then you need to hire a web designer/developer to build your website (your house), and you need to pay a monthly fee to a hosting company to maintain the site (let’s call it HOA/taxes/Insurance fees).
To break it down a bit further:
- Domain Name (Your Internet Address):
- In this analogy, a domain name is like the physical address of a house in the real estate market.
- Bluehost comes into play here as a domain registrar. You can purchase and register your domain name (like www.leesocnotary.com) through Bluehost. This is like acquiring the land where you’ll build your house.
- Web Designer/Developer (Building Your House):
- In the world of websites, WordPress acts like the architect and construction company. It’s the platform where you ‘build’ your website.
- WordPress provides the tools and materials (like themes and plugins) to construct your website. This is like designing the layout of your house and deciding on the construction materials. You can do it yourself with WordPress’s user-friendly interface.
- Hosting Company (Maintenance Fees/HOA/Taxes/Insurance):
- After building your website, it needs a place to ‘live’ on the Internet. This is where web hosting services like Bluehost come in.
- Bluehost is like the housing community or the entity you pay maintenance fees to. They provide the server space where your website data is stored and ensure that your website is accessible to visitors 24/7, much like paying for utilities, HOA, taxes, or insurance to maintain your house.
In this analogy, WordPress is the tool you use to build your website (the house), while Bluehost provides the land and ongoing maintenance services necessary to keep your website (house) live and accessible on the Internet.
Why WordPress?
When I first started, I compared WordPress to Adobe Dreamweaver. I researched and decided WordPress would be the best option for me. According to W3Techs.com, WordPress software powers 40% of the top 10 million websites in the world. Discovering this made sense since I know there will be a lot of information I can find on WordPress. I opted for WordPress for these additional reasons:
- Ease of Use: No coding required because you can select themes and it is a drag and insert option as you customize your website.
- Flexibility: A great number of themes and plugins.
- SEO-Friendly: I ensured as much consideration for SEO on my website and used the Yoast plugins to monitor my System Engine Optimization.
- Community Support: Access to tutorials and forums. You can find so much on Pinterest, You Tube, ChatGPT, and so much more.
- Responsive Design: Mobile-ready themes. My desktop and my mobile app are slightly different in look and WordPress has features to help customize this for me.
- Regular Updates: Keeping your site secure. There are different plugins to help keep your website secure.
- E-Commerce Integration: WooCommerce. There are theme templates that have commerce feature so you can sell your products on your website.
Why Bluehost?
Choosing Bluehost started with asking friends and family about who they used. My sister has built a few websites previously and recommended Bluehost. After some research I did decide on Bluehost for these reasons:
- Beginner-Friendly: Intuitive interface. The home screen is easy for me to navigate through.
- WordPress Integration: Seamless and efficient. This was a big deal because I followed a few steps and WordPress downloaded and my website was set.
- Affordable: Cost-effective hosting plans. There are different plans.
- Free Domain: Included in the first year.
- Online Support: This was crucial for me when I had questions on my website. I was able to reach out to their customer service via a phone call or their live Chat.
After understanding the roles of WordPress and Bluehost in creating and maintaining a website, I chose this powerful combination.
Now, let’s build your website.
I’ll walk you through the step-by-step process of how to build your website using WordPress and Bluehost.
This is a step-by-step guide, ensuring that even those with limited technical skills can create a professional-looking website.
So, grab your digital tools, and let’s start building your online presence!” You’ve got this! 🙂
Ready to begin?
Step 1: Simply Click Here And Then Hit The ‘Get Started Now’ Button to Embark On Your Journey!

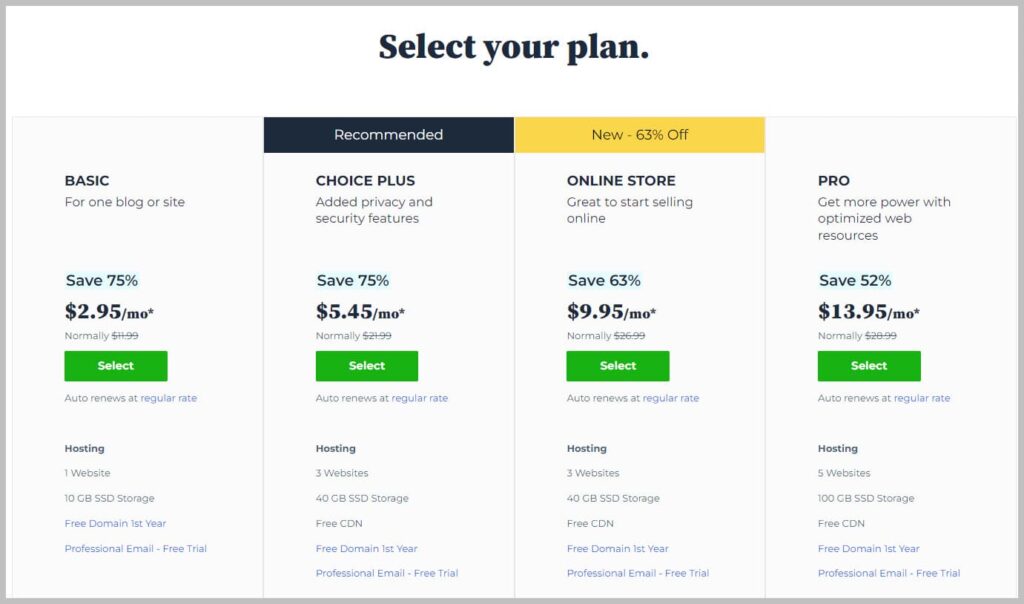
Step 2: Select A Plan

I initially selected the basic plan for my notary website. However, as I got more comfortable with building websites, I upgraded to the Choice Plus plan, which allowed me to create and manage additional websites.
Step 3: Create a Domain Name

This is where you choose a name for your website. Some tips on a domain name are 1) something easy to remember and resonates with you, 2) incorporate keywords to reflect your business and 3) the extension that is recognizable such as .com, .org, etc.
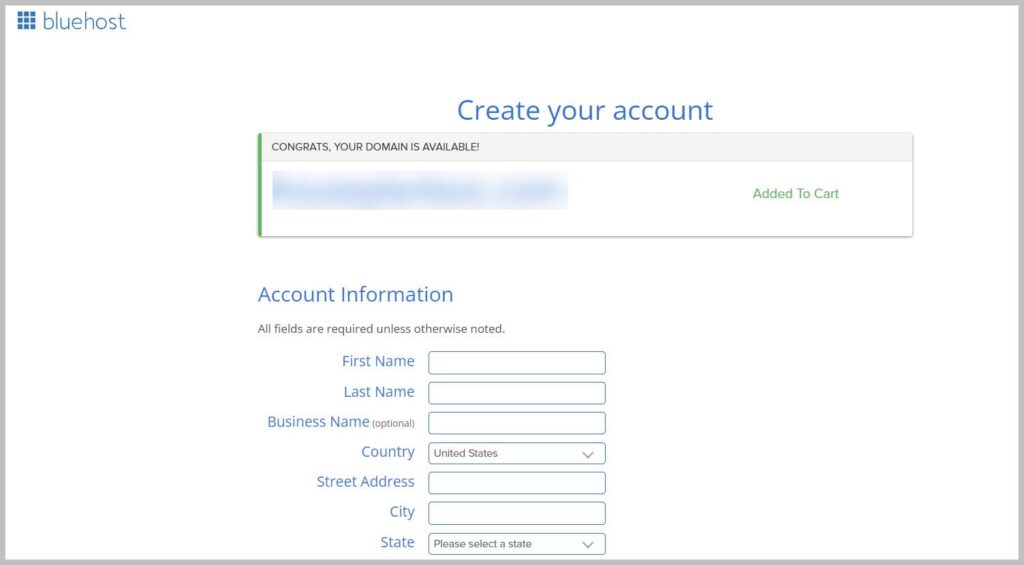
Step 4: Create your Hosting Account
Once you finalize your domain name you will click next, and it will take you to the screen to create your hosting account.

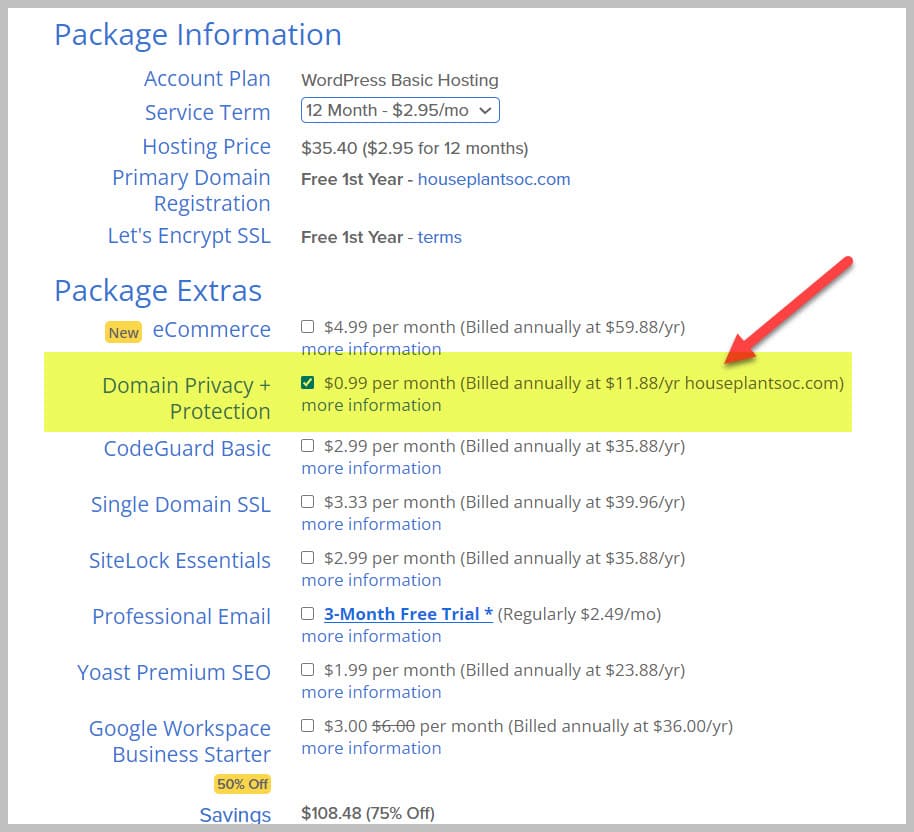
Step 5: Choose A Package

When selecting your hosting plan, I suggest starting with the 12-month option, which costs $2.95 per month, amounting to $35.40 annually. With this this promotion you can get 75% off.
Regarding additional features, Bluehost offers various paid services such as eCommerce, Yoast, and SEO tools. In my experience, many of these functionalities can be added with free WordPress plugins.
The one extra I do recommend is Domain Privacy Protection, which I’ve consistently used for my websites to safeguard personal information. This feature is explained if you click on ‘more information’.

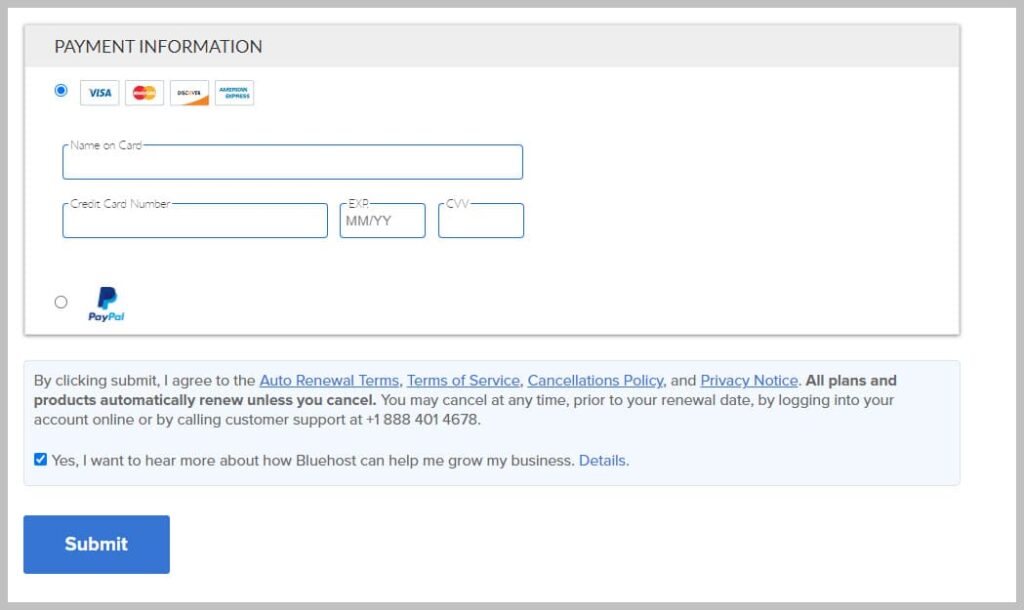
Step 6: Complete Your Purchase and Submit

Step 7: You're Done!
Once you complete these steps, you’re fully equipped to begin your online journey.
Bluehost simplifies the process by automatically installing WordPress for you.
With this setup complete, you can now access your WordPress dashboard. This is where the real fun begins – customizing your website to match your vision and style!
Congratulations!
Author Bio:
After experiencing two layoffs in 2023, I, Phuong Lee, decided to take control of my future and opened Lee’s OC Notary. This period in my life highlighted the importance of having multiple streams of income. Owning my own business has given me the unique opportunity to grow and shape the company according to my business aspirations. At Lee’s OC Notary, I am committed to providing excellent services while continuously expanding and adapting to the evolving needs of our clients.